Growing radishes on a windowsill

How to grow radishes on a window sill - step by step guide

Greetings to you, dear friends!

Growing radishes on the windowsill - is not only interesting, but also quite useful exercise. Even if you have never engaged in the cultivation of any plant in his apartment, the cultivation of radish you will certainly manage.
The advantages of growing radishes home

Radish - it is a unique source of vitamins and minerals that are vital, especially in winter, when almost all people suffer from vitamin deficiency. Moreover, it is necessary for the maturation of radish little time, and during the winter you can rent 2 crop. Radishes cross-pollinated, so the problems with the cultivation of this plant in the apartment appear, in principle, it should not be.
Choosing the right grade

Some varieties are especially undemanding, and choose them, you are guaranteed to get good, fresh, and most importantly environmentally friendly roots. If you are able to provide maximum moisture and heat your plants, it is recommended to use a variety called "Sora" - it matures in 25-30 days on the window sill and in the open field a little faster. If you want something less whimsical, you can use the "Carmen" or "Donar F1." Ripening time of these varieties is approximately the same. Read also about the best varieties of radish.


Step-by-step instruction


Step № 1. Training

When choosing containers for growing radishes on the windowsill, it is desirable to give preference to a long wooden box with a depth of at least 10 centimeters. The pots can be grown, but not very convenient. Plastic containers - it is the least good option, but if you can not find anything else, it is in principle possible to use it. But before you pour the soil in plastic containers is necessary to make small holes in them with hot nail. Instead of the usual recommended land substrate average density which comprises 75-80% of peat. Also, you should mix the substrate (substrate) with mineral mixtures for winter sprouts - sold in any flower shop.

Step № 2. Planting seeds

Make sure that all the seeds that you have purchased are suitable for planting. They must have approximately the same shape to have no odor and have no traces of putrefaction. Two days before planting the seeds, soak them in warm, boiled water. The water should be 35 degrees hotter. On the eve of the landing must be abundantly watered the soil so that the soil was moist, but not too much. Seeds should not be planted very deep - a maximum of 2 cm, but can be higher. After planting all the seeds it is desirable to cover your home garden film, but not too thick, and always transparent. So sprouts appear a few days earlier.

Step № 3. Caring for the planted trees

Radishes and this is good for growing on the windowsill, it's the fact that he was not moody. It is important to follow some simple rules, and you build an excellent harvest. Here are the rules.

• Keep indoor normal humidity and a temperature of no higher than 20 degrees,but not lower than 17.

• Daily watering their kitchen garden window, starting from the date of occurrence of shoots. But do not pour too heavily in the early stages of growth - water can damage the immature shoots.

• If possible, use a double-feeding - a week after the landing, and the beginning of the growth of roots.

• Take care that your garden gets enough light. It can be used for fluorescent lights of the night.

• Do not let the tops grow too rapidly, so you will not get large and tasty fruit.

• planted a second batch of radishes are not on the same ground, or at least wait two weeks, meanwhile feeding substrate.

As you can see, in the cultivation of radish on the window sill is not, in principle, nothing complicated, so everyone can cope with this task. Follow these instructions and you'll get an excellent harvest, which will bring you a favor and culinary pleasure in the cold and gloomy time of year. Does anyone have an opportunity, you have to think about growing radishes in a greenhouse. See you, my friends!

Very popular indoor growing medlar

 
                                                      Fruit garden on the windowsill
 Very popular indoor growing medlar. Medlar plants grown from seeds, fully retain varietal characteristics. So if you had a chance to taste the ripe, large and tasty berries medlar is not lost: take away the seeds for his new hobby. It does not matter whether it is the seeds of the Japanese medlar (loquat) or seeds medlar (Caucasian), both of these types are suitable for indoor growing. If you are unable to become the owner of the plant seedlings, sow the seeds safely. The land for sowing is taken very fertile, light.

Ideal mixture of humus - coarse sand - peat. Deepen the seeds of about 3 cm. Since young seedlings do not like the pick is better to plant in pots one seed. The term germination is dependent on the ambient temperature, the higher the faster. Keep the soil moderately moist, needs good drainage. Once the seedlings reach the third pair of leaves, the plant begins to form, because you do not need a high stick, and needs a lush bush. If the plant is not itself forks, you should Prischepa apex, then begin to form side shoots. Remember: correct krone - a pledge of the harvest!

   Medlar under indoor growing almost no infestation by pests, not sick. Therefore, all efforts should be directed to its timely transplant grows in a large bowl and regular watering and spraying. Medlar is very fond of bright light, water and the loose soil, but does not make a swamp, so besides a bright windowsill and good drainage needs regular loosening earthen coma. The fruiting seedling take 3-4 years, the seedling height of 50 cm possible in the first year. Blossoms medlar autumn, is a huge plus: in the gloomy weather outside are nice to look at the bush studded with bunches of flowers, reminiscent of apple. Color depending on the species and varieties can be white, cream, pink of various shades. In nature, a pollinator insects, so the plant needs the help of your hands with a brush.

Medlar well do without cross-pollination, so even when the content of a single instance, you can expect a good harvest. Adjust the amount of fruit on the bush is not necessary, it will make itself loquat. And in general, this is one of the most unpretentious of fruit, feels good in the garden (of course, in the corresponding latitudes), and heated in the winter the balcony and in the apartment. Fruits ripen in June and July, fully preserving the taste and aroma of the parent instance, and with good content can not only lose the fruit size of the parent, but even to surpass it. If you are new to the indoor horticulture, perhaps loquat is a plant, which is to stop the election.

   What fruits can be successfully grown in the apartment? You can try your hand at the exotic fruits and vegetables, but remember that most of the exotic comes to us from the other hemisphere where the seasons other, but in an apartment, you can create any comfortable conditions for plants. You can grow more familiar and popular fruit: for this there are dozens of species of citrus (lemon from the popular to exotic kumquat), get persimmon, feijoa, passifrut, Every housewife, well simply must cherish the windowsill laurel bushes, tea and jasmine. Who would refuse krupnoplodnogo sweet peppers or hot pepper? And why do not you try to grow coffee? People around the world who care about their health and prefer to grow the fruits and herbs themselves, very unsafe foods are purchased. But if you do not have your own garden, or you live in a different climate zone, why instead of useless furniture does not take the place of a home useful plants?

Step by step instructions to grow a home ginger

                                                            Growing ginger root

Each lady is watching her figure, I have since a long time ago admired the one of a kind properties of ginger.

Did you realize that you can become on your windowsill! What's more, appreciate the new, fragrant roots!

Ginger at home feels great. The fundamental thing to realize that amid the developing season endures 8-10 months. Ginger root is planted in February and March, it can be bought in a store or available. When you buy is important to pay consideration on the state of the tuber: it ought to be smooth and thick to the touch, have a live kidney recovery.


Before planting in the ground ginger root is important to wake up. For this reason it is plunged in a warm arrangement of potassium permanganate and held in it around a couple of hours. At that point put in a plastic pack until the buds like a potato. At the point when the eyes are well naklyunutsya, ginger rhizome part separated. Every part must be no less than one very much created kidney. Spot partitioning rhizomes powdered with charcoal and dried. Planted in wide shallow holder with great waste, which comprises of sand and stones and loaded with fruitful soil.

The dirt can be framed freely of turf earth, humus and sand in a proportion of 1: 1: 1/2, by and by seen that numerous individuals in these holders set night crawlers are added to a blend of slashed straw, takes off.

The spine is put evenly brought forth up by the kidney, and secured with earth at 2 cm. Water the inexhaustible and routinely, abstaining from drying of the dirt because of the tea, the straw, the other mulch.

The principal shoots show up following 1-2 months. In the mid year, hot climate with great pots of ginger can be taken beyond any confining influence air, dropwise with them into the dirt and shading from the sun. Under ideal conditions, the substance stature of break can achieve 1 meter. In harvest time, when the shoots will pass on, the rhizome to burrow, clear from the beginning put away in a dry spot. A piece of the root can be taken for utilization in nourishment or for the treatment. Another part to spare and plant the following season in the same way.

Crisp ginger rhizome can be put away on the base retire in the fridge for around a month, and dried and pummeled - up to 4 months

How to grow sorrel on a windowsill

How to grow sorrel on a windowsill and care for plants

It is not necessary to wait for the start of the season to eat the leaves of sorrel and cook your favorite healthy dishes. In winter, you can grow sorrel well on a windowsill or a glazed loggia.


                                                             Planting material

For the distillation of greenery used rhizomes 2-4-year-old plant to the large number of growth buds. Also sorrel grown from seed.

Lighting and temperature

It is desirable to break the mini-garden on the sill of a window overlooking the south side. However, sorrel, one of the few species of leafy greens, good tolerate shading. On this basis, it can be grown on windowsills Northern (northeast, northwest) windows.

In winter, when daylight hours and is so small, and most overcast days, to foliage not too stretched, it is possible to install additional lighting. It's enough to place at a height of 60 cm fluorescent lamp.

The plant is cold-resistant, so in a place where it is grown, the temperature can range from + 5 ° C to + 20 ° C. If you have a gazebo, where there is no frost (although greens can withstand frosts to -7 ° C), the containers can be sorrel and place it there.
Soil and Plant Capacity

Sorrel grows well on drained peat soil. You can use the purchased universal weakly acid substrate.

For the cultivation of sorrel can use any container. It is best to put together a wooden box, in accordance with the size of the window sill or on the balcony allotted space, but you can also use plastic containers and pots of various materials. At the bottom of the planting container pour the expanded clay or gravel to create a drainage layer. It is desirable that the container have holes for outputting excess moisture.
Planting and Care

Seeds are sown with a depth of about 0.8-1.1 cm. The optimal distance between the rows - not less than 7 cm, so you create for plant growth are good conditions. Groove with the seeds need to sprinkle on top of the substrate or ready sifted humus. Sowing sorrel can be carried out each month year round (in different containers). This will give you the opportunity to permanently cut the new crop.

After some time after emergence, preferably their thin out, leaving the shoots at a distance from each other by about 4 cm. Sorrel loves moisture, so make sure that the soil is always moist. Periodically, loose soil with a fork or a toothpick.

Feeding is carried out by any universal fertilizer complex intended for indoor plants, 1-2 times a month, spreading the solution in accordance with instructions.

2leep.com

Cedar - how to grow from seed


It is important most importantly to pick and set up the seeds. 

1. Take cedar nuts or expel them from the knocks. The seeds ought to have a charming emanation, they must demonstrate no hint of mold and waste. 

2. Give a soak seeds for two hours in a half-point arrangement of potassium permanganate (it will shield seedlings from parasitic maladies). 

3.Soak in water for 3 days, changing the water consistently. 

4. Through three days Drain and blend with nuts triple the volume of peat or coarse washed sand. 

5.The resulting mixture was seed blend and dampen the substrate with the goal that it is soggy yet not trickling water when you crush it in your clench hand. 

6.Mixture put in a wooden box with gaps in the sides and base to guarantee a stream of air. 

7.1 time 2-3 weeks is important to dampen the seeds to its unique condition. 

8. Container with seeds ought to be put away at a temperature of +4 to + 6 ° C - for instance, in the basement, storm cellar or icebox. 

Grow a sapling - is, obviously, its not one day. Since numerous individuals want to purchase instant planting material. At that point recollect this govern: the littler the age taken for transplanting seedlings of cedar, the less demanding they get usual to the new area. The best age - 7-8 years; seedlings over exposed root acclimatized more regrettable. 


Don't try to make a cedar seedlings "best conditions", "prepare" arriving - simply delve in the ground a little space on the measure of the roots, sprinkle the foundations of the earth. Spread around the stem planted cedar woodland floor, where you wrapped the roots in the wake of burrowing seedlings. Sprinkle on top of the ground sawdust, grass or takes off. 

Pour. Coincidentally, cedar likes steady soil dampness - this is the fundamental condition for effective engraftment seedlings. Indeed a short drying of the dirt is adverse to him. Yet not the "headache" it! Overabundance dampness can destroy the tree. 

Make certain pritenit seedling in the first year. Alternately plant it by the deciduous derevom- "caretaker", earned him a shadow, or even in the shade arrangement trees. In the first years of life cedar trees effectively endure shade and even need it. 

In consequent years, care cedar will be weeding weeds. Don't discard weed grass and unpack it under the tree - it will give a cedar board and hold dampness in the dirt. Attempt to keep the cedar tree trunks are not under grassing, and under profound natural mulch. 

Never burrow or slacken the dirt close to the cedar seedling - it simply hurt him. Notwithstanding mulch, cedar nothing more is obliged, no "compost" just direct watering seedlings in dry climate. All things considered, in case you're in the spring to recharge mulch pine litter of pine woodland, surprisingly better - from cedar wood. 

Do this at any rate in the first years of life seedling in another spot: from the timberland litter brought by the mycelium of mycorrhizal growths will guarantee the solid improvement of the cedar, and will secure against pathogenic parasites. 


So as you likely comprehend from this article to develop from seeds cedar home is not all that hard if required a lot of exertion


2leep.com

Cuban cherry


Dwarfs the so-called Cuban cherries. The present name of the plant - nightshade pepper (Solanum capsicastrum). If the diseases of the throat, eat two or three berries in the day, it speeds recovery. This relative of tomato leaves and fruits like cherry. This stunted (70-90 cm), evergreen shrub. Tomentose shoots densely caked elongated, elliptical dark green leaves. The flowers are five-lobed, white, self-pollinating. Fruit - round red berry 1-1.5 cm in diameter.
Homeland Cuban cherries - the humid tropics of America and in our country it is found in the collections of botanical gardens and decorative indoor gardening enthusiasts. The plant is unpretentious, abundantly fruiting. Well propagated by seeds, while maintaining the hereditary characteristics. Within 5-7 months after sowing seeds bloom, and soon appear and fruits, while, however, a few.
     In Russia, the plant appeared not so long ago, but in the West and America, it is grown in many New Year and Christmas, for the fact that it looks wonderful. Especially this notice in the winter, when the window blizzard
The plant is especially beautiful when on the branches at the same time and ripe fruit, and ovary, and white flowers.
Propagated it, as a rule, the seeds, but you can semilignified green cuttings. And in both cases, the soil is composed of sand, humus, sod land (1: 1: 3). At the bottom of the pot is placed drainage of pebbles, gravel or broken bricks, glass, lumps of charcoal and coarse sand. At the bottom of the pot must be several openings, to the water does not stagnate, root rot may otherwise. But Cuban cherry - water-loving plant, drying earthen coma can not be tolerated. Watered it 1 time per day, and in the summer 2-3 times. Very responsive to fertilizer plant. Fed a cherry infusion of chicken manure (1:14) and a fertilizer mixture for ornamental pot plants and type vito (dosage on the package) - once a month in the winter, summer - once every 10 days, alternating organic fertilization with mineral. In summer you can make the plant in a garden or on a balcony, loggia, on the first two weeks in partial shade to prevent leaf scorch. Cuban cherries are usually transplanted in the spring, in April - May, and every once in a larger bowl. If the plant is 2 years, you need a 2-liter pot, up to 5 years - 4.5-liter, 7-year-old bush - 6.8 liter. Young plants are transplanted each year, after five years - 1 every 2-3 years with partial replacement of soil. Plants form a better bushy, it needs to cut the ends of the shoots by about 1/4.


Cuban cherry aphid damage sometimes. To combat it was sprayed with tincture of tobacco dust, garlic or ash. The infusion of garlic can be prepared as follows: 3.2 g of crushed garlic dissolve in a glass of water and spray the plants immediately. Infusion of wood ash: 300 g of wood ash pour a liter of water, leave for 2 days and then spray the plants. Tobacco dust from: 10 g of tobacco dust pour 200 g of water and infuse two days. Diluted before spraying equal amount of water and add little soap.
In processing plants need soil in the pot cover with plastic wrap or paper.


2leep.com

How to grow a walnut on the windowsill


Personally, I use the following technology. After the green walnuts ripe and began to crumble to the ground (in our climatic conditions it is usually in the middle or at the end of September), selects the largest of them. Particular attention is drawn to the selection of walnut shells. It should not have any visible defects, stains and damage. Next stack nuts on a bed, sprinkled a small amount of crop residues (you can just bury them in the ground at a shallow depth, about 5-7 cm). This is done in order to walnuts are no birds, rodents, or proteins.
Now we can only wait for the first frost. Usually at this time of year is a lot of rain, so crop residues are always wet. If established, dry and sunny weather, rain and not, necessarily need extra watering. So our nuts are stratification.

By the time the first frost walnuts, as a rule, all split. Now the nuts are very vulnerable. Walnut kernel oreha- this delicacy for all kinds of insects, worms and rodents. If the nuts are left lying in the ground until spring, then they can become a tasty morsel for the above "guests". The probability of bark in the spring is only single copies, if not an opportunity lost.

  Of the beds in the house

Therefore, it is necessary to dig up the nuts, collect and immediately to land. Walnut planted in plastic cups of beer volume of 0.5 liters. At the bottom of the glass puncture hole to drain excess moisture. Seating capacity fill moist garden soil. In the ground to a depth of 5 cm laid our "strong" nut. Moreover, it is necessary to put a nut sideways so that part was chopped top and bottom. Sprinkle on top of the ground plant material and watered. Further capacity with walnuts put in the basement, cellar or balcony for storage.

Walnut on the windowsill


At the end of the month of January should get our cups with storage, abundantly watered and put them on the window sill. After about 15-20 days the seedlings appear. And in a month already seedling reaches a height of 10 cm. Now walnuts to be transplanted into a large bowl. For these purposes, I use the container made of liter, half-liter or plastic bottles. Bottles sliced height of 15-20 cm, pierce holes in the bottom to drain excess moisture. Transplanted nuts put back on the windowsill and take care of them. Care is timely watering and feeding. Seedlings grow and develop well in moderate soil moisture.
In mid-April, when the daytime temperature reaches + 15..18ºC, walnut seedlings exhibiting gazebo. Here are the nuts gradually hardened before planting in open ground. Belarus - the second half of May, when the threat of spring frosts return pass. By this time our seedlings grow up to 20-25 cm. When transplanting in the open ground continue to grow and develop strongly. Characteristically, if not walnuts in autumn dig up and leave to develop in vivo, in the second half of May, the nuts are just beginning to germinate and grow in the autumn height only 10-20 cm.

2leep.com

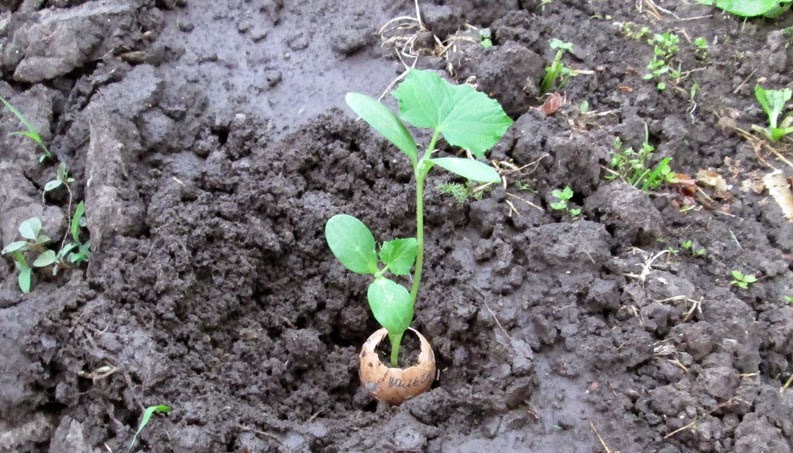
How to growng seedlings in the eggshell


Sometimes capricious seeds (bad germinate) or even to germinate. In addition, the seedlings are not very easy to tolerate transplantation, and the search for glasses are always problems. Therefore, many gardeners have come up with to use as containers for seedlings, egg shells, which are stocking all winter.

                                                              what is needed

                                                                - Seeds.

                                                                - Grunt.

                                                                - Eggshell.

                                                                - Pallets from the eggs.

                                                                - Film.

                                                                    what next

Eggshell for planting seeds must be intact and well dried.


In her fall asleep fertile soil, put 1 - 2 seeds and sprinkle on top of loose soil at 1 - 2 cm.

Shell put into containers for storing eggs and covered with transparent film.


CAUTION: Since the amount of soil in the shell is limited, it is necessary to make sure that it does not dry up.

Around the fifth day, when the seeds hatch, you can clear film cover, while continuing to monitor soil moisture.


Another 10-14 days seedlings kept on the windowsill. And when the warm weather, can be taken outside for hardening.


                                           By the time of planting will be strong and stocky.


When planting seedlings in open ground do not need to be removed from the shell, but only slightly clenched in a fist, so that it is cracked, and drop into the hole.


The result - the plants receive additional fertilizer, because in a lot of shell lime. Eggshell reduces the acidity of the soil, improves its structure, increases the efficiency of mineral fertilizers. Seedlings rapidly gaining strength, and gives a great harvest.

2leep.com

How to grow lilacs for Christmas


Year has not yet come, and even the pre-turmoil is not observed and there is no hint of imminent triumph, but should figure out how to decorate your table and surprise that their guests. For example, you can impress the audience by placing a vase Dec. 31, full of fragrant lilacs. Where to get it? Themselves to grow in the winter.


And So ...
produce a distillation of lilac in the winter, you need to take a few branches that have well-developed flower buds. Sami branches must be cut at the end of October or early November. After cutting them placed for 5 weeks in a refrigerator at a temperature in the range -3 - (- 5) degrees. If you cut the branches in December or later, they are no longer required promorazhivat. Somewhere in the middle of December, placed in the refrigerator branches are removed and placed on a term of up to 12 hours OT8 in a bath filled with water at a temperature not higher than room temperature. After a bath threads get, and the ends of their fragmenting. Samuel lilac after such a procedure, plunging to a depth of no more than 20 cm, and put in a special pre-prepared (for 5-6 hours before) solution.

Solution Recipe: 1 liter of water is taken, it is added 0.8 g of potassium alum, 0.2 gram of sodium chloride (i.e., sodium chloride), 0.3 g of potassium chloride, and 3 g of sugar.

To get something you have, the solution should be changed daily, as well as daily updates on the ends of the cut-off place. The temperature of the ambient air must be between + 18 (+20) degrees. In addition, you will need very high humidity, which often flower buds have to spray the water. Days 15-20 lilac, if done right, will bloom. To preserve the flowers fresh for a long time, twigs placed in a vase with a very feeble solution of citric acid; in the water you can add vinegar - just a few drops.

In the future, if you have a cottage there lilac bushes and you want to do it by distillation, starting somewhere from late May until the end of June, the bushes to be a good fertilizer.


2leep.com

How to grow an oak tree from an acorn


In terms of projects on gardening little compared to the duration of the project for the cultivation of their own sprawling oak from an acorn! Fortunately, the cultivation of oaks - this activity is fairly simple and amazingly useful. It also gives a memorable opportunity for you and your family to grow up next to a tree, which is small at first, will eventually become a massive emphasis in your neighborhood and this gift will go towards future generations. As it grows you have the opportunity to take an active part in the life cycle of the natural beauty of wood. Start with Step 1 - Please note that ideally this process should begin in late summer or early autumn.


                                                      Selecting and planting acorns


1.Collect acorns early autumn. Acorns are best harvested before mid-autumn before they fall off the trees.  Select acorns without worm holes and mold. Suitable acorns should be brownish with a small green tint,  although the appearance of acorns varies depending on the type of oak in which they grew up. As a rule, for the collection of best fit those that are easily removed from the cap.
Note that the hat is not part of an acorn, a (separate) the protection of some sort. Taking off with acorn caps, you will not hurt, unless he broke down the acorn.
If possible, find suitable trees in the summer. You need to acorns mature tree which is easily accessible via stairs or a long stick.
Some species of oaks, for example, in red oak acorns mature in two years rather than one.  If you pick the right tree in the summer, remember this - on some acorns mature oaks in the autumn, while the other will not be ready until next year.
advertising


2.Conduct "floating" test. Put gathered acorns in a bucket of water. Wait a couple of minutes. Throw away all the acorns that are left to swim - they are spoiled.
If at any time you notice that the acorn is soft to the touch, throw it away too. Soft, shapeless acorns rotten inside.


3. Enter the remaining acorns into a state of hibernation. Take the "good" acorns from the water and dry them. Put them in a large resealable bag with dry wood shavings, vermiculite mixture of moss or nutrient medium that can retain moisture. In a particularly big package should fit up to 250 acorns. Place the package on a half months in the refrigerator or longer - as much as necessary, to a new oak sprouted.
This process is known as stratification, which in simple terms means the impact on the cold seeds, simulating the natural conditions in which the seed falls when falling to the ground. This starts the germination of the seed in the spring.
Periodically check the acorns. The nutrient medium should be only slightly damp. If it is too wet - acorns can rot if too dry - they can not grow.


4. Watch the growth of your acorns. Even when they were stored in a refrigerator, most acorns will germinate in a humid environment. Root tip can begin to break through the shell around the beginning of December (late fall, early winter). Regardless of whether or not sprouted root, acorns ready for planting after 40-45 days of storage.
Treat your seedlings carefully - the protruding roots are easily damaged.


5.Plant each acorn in a pot or container. Find a small diameter (5 cm) garden pots (or if you prefer, large plastic cups or milk cartons) for your plants. Fill them with quality garden soil (some sources advise add shredded peat moss. For watering leave empty top about 2 centimeters. Put your acorn deep under the surface of the spine down.
If you use plastic cups or milk cartons, pierce holes on the sides of the bottom of the cup to allow water to come out.
If you want, you can also try simply to bury an acorn in the garden. Prikopalis spine, and gently press down one acorn into a suitable strontium rich, soft ground. This will work only if the root is already well developed, long and well departs from the acorn. Note - so seedlings will be vulnerable to mice, squirrels, etc.


6.Pour your seedlings. Watering your plant until such time until the water flow out of the hole at the bottom of the container. In the following weeks watering often, not allowing the ground to dry. In this period of life keep your seedlings indoors. Put it on a window sill at the southern window, so that it can absorb the winter sun. You do not immediately notice the rapid growth. This is because at this stage of their life in plants below the soil surface is developed taproot.
If you live in the southern hemisphere put your seedlings on the windowsill in the north window.

                                                                   Transplant seedlings


Watch the growth of plants. Gardeners differently advise what to do next - Some Tips to transplant seedlings immediately in the open ground after a few weeks of growth in the pot , while others are advised to gradually increase the time spent outside the plant before it landed in open ground. It is also advised to transplant seedling in a pot of larger size that it further grew and only then planted in the soil. Though there is no one right way to determine when the seedlings can be planted in open ground, there are signs that indicate to you that it is ready for transplant. Suitable candidates for transplantation:
                              height of about 10-15 cm with small leaves.
                              him looking healthy, white roots.
                              clearly outgrown its pot.
                              the main root of well grown.
                              its age from several weeks to several months.


2. Select a place to land. Location means a lot - choose for your place of oak, which is enough space to grow and not have discomfort when the tree will grow big. When choosing a location for your oak should consider a few things:
The availability of sunlight. Like all living plant photosynthesis, oak need sunlight to live, so it did not land in dark places.
Place away from the tracks, plumbing, piping in the ground, etc. You do not want to kill your tree if you have to do any work in the garden.
Shadow that will cast a mature tree. If you want the tree to give shade for your home, put him on the west or south-west side of your home to increase shading in summer and winter to reduce it. 
Note - in the southern hemisphere should plant a tree on the west or north-west side of your home to get the shading.
Vegetation nearby. Plants compete with each other for the sun, moisture and other resources. Do not set down in either oak where many already growing other plants, or it can not grow up to adulthood.


3.Preparing place to land. Once you have chosen the right place for your tree, remove the sod in a circle with a diameter of about 1 meter. Shovel digging up the soil to a depth of about 25 inches, breaking large lumps.  If the ground is dry, moisten it yourself or wait until after the rain, before plant your tree.


4. Dig a hole. In the middle of your meter circle dig a hole depth of 6-90 centimeters and 30 centimeters wide. The exact depth of your pit depends on the length of the main root of your seedling - it must be large enough to fit.


5. Transplant your oak. Root down and leaves up gently place your oak tree in the prepared hole. Make sure that the depth enough to fit oak root. Fill the earth and gently tap. Pour after transplantation.
Tamp the soil around the seedling oak, making the slope in the direction of the seedlings to water does not stay near the tree trunk - this can damage it.
Put a circle or pieces of bark mulch about 30 inches from the tree to the ground remained moist and weeds do not germinate. Make sure it does not touch the stem of the tree.
To increase the chances of a successful transplant, you should plant a few acorns in one place. In this case your plant acorn sprouts directly in the ground, clearing an area measuring 60 by 60 inches and place it on this site two acorn, covered with a layer of soil 2-5 inches thick.

                                                                   Care oaks


1.Protect your oaks. Oaks - especially the young and tender - a source of food for many herbivores. Acorns like a snack and mouse proteins, which can easily dig them. Small seedlings are vulnerable to rabbit, deer and other animals that feed on leaves. To make sure that your trees have been destroyed, take steps to protect them. Put around trees lattice of mesh netting or strong plastic fence around the trunk to them before they reached the animals.
If you live in an area where there are deer, you should also protect the crown of the tree grid.
You may need to use pesticides to protect your tree from a variety of insects, including aphids and beetles. Be careful when choosing pesticides - use only those that do not harm your tree and your family.


2. Irrigated trees in dry weather. Long root oak allows him to extract moisture from a depth even when the soil surface is completely dry. Winter and rainy months of your oaks usually do not need to be watered. However, when the oaks are still young, they may suffer from hot and dry weather. Install a drip irrigation - a good way to deliver water to the young trees, especially when they need it. Take for irrigation drip about 30 liters of water for one to two weeks. Irrigation during the hottest and driest months required in the first two years, with the growth of the tree can reduce the intensity of irrigation.
Remember that water should not be given to gather around the tree trunk. Set your irrigation system so that water dripping around the tree, but not directly on the trunk, where it can cause rotting.


3.Po the growth of the tree will be less in need of care. As your oak grows, and its roots go deeper, you will need to take care of it less and less. In the end, it will be a great and high, and the animals will not be able to destroy it, and the roots will be deep enough to survive the summer without watering. Gradually, over several years, reduces the degree of caring for your tree (which apart from watering during dry months and protection from animals more than anything is not included). Over time, your tree will thrive on their own without any signs of exhaustion. Enjoy the gift of yourself and your family that will stay with you for life!
After 20 years of oak can start your own fruit acorns, but it depends on the type of wood. Optimal growth of acorns may not happen in 50 years.


Tips
Even small oak trees shed their leaves in the fall, so do not worry if your tree, the leaves turned yellow and fell off. Just wait until spring.
Plug into the ground with a stick protective netting around the seedlings to avoid being eaten by animals.
Inspect the tree from which you collect acorns - it should be beautiful and healthy. If the parent tree has a problem - choose a different, better.
advertising

2leep.com

How to grow seed passion fruit


Passion fruit is an ancient genus of tropical crops Passiflora. In Australia, the fruit are called Passion, which literally translates as "passion fruit". Africans call him Granadilla, and in Malaysia and Indonesia - "Marquis". Passion is the birthplace of southern Brazil.


In spring and summer, passion fruit propagated apical cuttings (using stalks after pruning). Before planting, the lower ends of the cuttings should be disinfected to prevent rotting, and then slices powder wood ash.


Cuttings are planted in a mixture of equal parts of any nutrient light of earth and sand. For rapid establishment requires a high air and soil temperature (not lower than 25 degrees). For these purposes it is better to use mini-teplichke with bottom heating. Cuttings should be watered regularly and spray with warm water.


Much less hassle delivers seed propagation, which can be sown at any time of the year. Seeds germinate quickly and amicably. The seedlings grow well and usually two weeks in phase two or three true leaves, they are transplanted to a permanent place in loose fertile mixture of leaf soil, humus, sod land, peat and sand, taken in equal parts.


Initially, passion fruit transplanted every spring, and then after two or three years. When transplanting use pots slightly larger diameter, since a significant increase in the root system can lead to the rapid growth of shoots at the expense of flowering.


Lack of passion fruit seed reproduction is later stages of fruiting (the second or fourth year). It is important to remember that the passion fruit vine is, and it needs support.


This photophilous plant grows well on windows facing south, east or west side. Passion fruit, and can contain a field with a certain shading, but in this case the bloom is less active.


Passionfruit loves fresh air, but can not tolerate drafts, in response to which can dump the leaves.


In the summer of passion fruit recommended plenty of water and spray as often as possible. In winter, when the air temperature drops water treatment should be carried out occasionally.


                                                                     Passionfruit
What do you know about this sultry beauty bright? Few of us realize that this exotic fruit can be found not only in the store, but also to grow the most. Then you can safely say all my friends that grow these exotic fruits at home. Another name - passionflower edible. It grows near the Amazon River and in some other parts of South America, where there is a tropical rainforest.

                                                                         Lighting
Of course, passionflower need bright light for proper growth. It would be great to grow even in direct sunlight. So no need to once again worry about shading. Still it is possible to raise it in the shade. She also begins to develop well, just do not be active flowering. If possible, you can put a lamp that will simulate daylight. Also, do not forget to constantly ventilate the room. This is very useful for plants. In the summer it will certainly need fresh air. Therefore, place the pot at the open window or make it on the balcony.

                                                                    Watering
There is only one important factor that you need to keep in mind - is watering passion fruit. It is desirable that he was always plentiful. Moisturize the plant as soon as the soil begins to dry out. It should be always damp, in particular, it concerns the period of growth and flowering. If the ground is overdried, the leaves begin to fall rapidly. And then, it can lead to death. If moistened earth com or water will stagnate in the pan, then there will be a lot of problems. So stay tuned for watering. It is important not to overdo it. Of course, winter watering should be gradually reduced. Can also be sprayed from time to time with warm water leaves the plant. This is especially true hot, poorly ventilated areas with very dry air. If you want to increase the moisture, then put the pot on a specially-prepared pan, place where pre-wet porous material. This can be expanded clay or peat.

                                                                        Nutrition
The vegetation period lasts from March to August. At this time, the power needed. Fed once or twice a week. In winter, do not need fertilizer.
It often happens that shoots eventually become bare. This means that plants need Forming. For example, if the branch is very elongated, they should be cut off half. But it is sure to leave a piece of branches up to five centimeters. From then it will grow new shoots.

2leep.com

How to grow a melon on the windowsill


                                                          Fragrant melon on the window


Melon
This juicy summer beauty can be grown in an apartment. Enough to have warm sunny windowsill.

1. Before sowing seeds treat potassium permanganate. 8 hours can soak seeds in a solution of trace elements.
2. After rassypte seeds on thin gauze until germination.
3. The soil should be loose: Mix equal parts of turf earth, humus, peat and sand. At the bottom of the box lay drainage.
4. Pour the solution of potassium permanganate ground pink.
5. The seeds are planted at a depth of 1 cm. Top cover with foil and put in the battery.
6. Once the seeds germinate, remove the tape and move the seedlings on the windowsill.
7.Every otner day watering plants and fertilize with a solution mullein or bird droppings
8. The temperature should be above 20-25 degrees. To maintain soil temperature can close the black film.
9. Pollinate melon must manually. Touch the stamens of male flowers to the stigma of the female flower.

2leep.com

How to grow a watermelons on the windowsill


Growing watermelon at home quite easily. With the right approach in May, you can get a full fruit.
Seeding can be done immediately to a permanent place, without planting seedlings. Given the size of the root system of the plants of the future, it is necessary to use a bucket or tub volume of about 10 liters.
Preparing the ground for about 30 days prior to planting of fertile soil with humus and trace elements. It is subjected to a pre-liming.
In the middle of the bucket at a shallow depth (approximately 3 cm) placed two or three seeds. After sprouting leaves the strongest plant. Place the plants on a wide windowsill. Joinery should be tightly closed to keep the cold air seeping. At the bottom of the bucket is necessary to make holes to drain excess water. If the vessel wall transmit light, it is necessary to wrap something dark to prevent greening roots.


Development of the plant until the first fruits lasts about 3 months. The first half of the term falls on the growth of the plants, the second - the ripening of the fruit.
At a time when daylight lasts less than 12 hours, watermelons need supplementary lighting. To do this, the window is set lyuminisentnye lamps to give coverage volume, need reflectors.
Of fertilizer in the early development of plants need nitrogen and phosphorus in equal measure, with ripe fruit - a high proportion of potassium and a little nitrogen.
The stem is grown on the support of up to 1m, then it should be prischipnut. The plants remain at no more than two fetuses. When the fetus becomes the size of an orange, it is put into the net and tie. The fruit watermelon home is small, about 700 g, but thin-skinned.

2leep.com

Dwarf fruit trees apple and pear on the windowsill


      Dwarf fruit trees apple and pear on the windowsill - it is nothing like columnar varieties of apples and pears grown in pots.

Dwarf fruit trees require after leaf fall, a period of rest, otherwise - no fruit. Therefore, the pots of trees should be moved to a cold room is not below -15 ° C.

Dwarf fruit apple trees and pear trees are needed for the passage of small cold dormancy period. They can be kept in the basement or in a cold barn, previously heaped pots filings.

If autumn leave pots on the balcony of the complete freezing of the roots will help the box with sawdust, and which will be in pots with fruit trees.

With the onset of spring, skid pots in an apartment on the windowsill.


Although the dwarf fruit tree are urged to self bare the most attention. They appreciate a sunny place, permeable, luxury turf ground. Tub, in a sapling grows dwarf, is bound to be the size of a minimum quantity of 30 l-t In warm weather, the plant evaporates a lot of water through the leaves. Because quite weighty choose a tub with great capacity. More than the capacity, the better the water retained in the matrix. Consequently, the plant receives more rational conditions for its own full-fledged development. Also, in the great tubs with fruit trees or ground cover may implanting ampelnye small plants, such as strawberries or strawberry. Specious hiding ground, they give a certain charm and comfort.

For miniature fruit gain, rising in tubs, you will need to provide a good water drainage. To achieve the desired result in the ground pour 5-7 Santa. layer of expanded clay. Say with all other plants, trees will need to be checked for the presence of pests. Each year, you will need to cut the side shoots, giving it his own bonsai desired shape. At constant watering and fertilizing, your dwarf fruit trees will entertain you generous and prosperous harvests.

2leep.com

Roses : cultivation and maintenance in the home

The need for very large rose.
It is the leading culture of ornamental plants. They are widely used for landscaping urban and rural locations . Roses occupy a leading position among ornamental plants and are unmatched in richness and abundance of flowers , shape , color and tenderness of their flavors.

rose Home


Rose - is a plant that belongs to a series of wild roses . If you want to grow a rose in the home , it is necessary to choose dwarf varieties of roses. This is due to the fact that the roots of the roses are very large and they will work closely in a flowerpot . Roses placed in a sunny, bright and well-ventilated area . During the summer, the flower can be taken out into the street , and in the cold season flower should be placed in a room at a temperature of 10 degrees. Watering should be regular roses at any time of the year and to the best , you must also ensure that irrigation water was always fresh . Until mid-September flowers fertilize once every two weeks . In winter, reduce watering roses.

The main task at the correct growing roses at home, is that your little rose bloomed at any time of the year , and especially during those periods when the flowers a little, and do not forget about the light and shade in the room - then do it.

In the summer rose imposed on the street under the sun - the sun's rays flower save from pests, and often sprinkled with water to buds and leaves are not wet. When the weather is not sunny , you can not water the rose , as in the air and so much moisture.

Watering roses home

Watering - the most important moment in growing roses - never forget about it and do not let the roots began to dry out . Watering must long to complete filling of ground water. Try not to pour , because it is harmful to the roots of the flower. To wood rosettes was in good condition , reduce watering it until the end of August. In the middle of fall, rose to it grew completely remove the entire plant from the pot and just lay on the windowsill , and buds that are left - just delete.

Soil and land for a home rose

Since Rose is very fussy plants and land for them to be fortified , which contributes to the flowering indoors . Soil for roses prepared from humus, clay, sand and bird droppings - it was good as growing roses in the garden and in the home.
From pests and diseases of different roses are in the room and in the garden, are not insured - so fight them carefully . For example, from appearing on the rose aphid makes soap solution . This procedure should be carried out once in six days . In the fight against ticks helps a garlic extract on the water. To do this, 70 grams of garlic pounded in a purified form and pour a glass of warm water, then let stand 30 minutes and strain through cheesecloth solution , then diluted even half a liter of water. To wash the flower of such a solution , we must take a half cup of the resulting solution in a bucket of water. In the spring you can pour into the soil rose granite dust to protect the plants from destruction - and it operates throughout the summer season . Periodically, but rather every six days
rose  solution sprayed copper and sulfur.

Replanting and care home rose

Transplanting roses from a pot held in mid-August , then the plant will start up new roots before winter and is a good chance that the spring bloom rose . But if the transplant spends spring , the plant will flower only after a year . In order to transplant a rose , you must use small pots so that the soil dries quickly , otherwise the land will be constantly wet and sour and then the plant dies.

Roses should be cut periodically to form a bush was beautiful and so you remove excess shoots and shoots dead roses. Pruning is usually carried out in winter as overgrowing bush.The first step is cut all the little curves and weak branches. At each shoot left for five to seven buds , and the rest - is removed to have a place for strong buds. If the winding rose , then cut only dead , dried twigs and extra - on flavor is not affected.

Also, when growing roses , be aware that a large number of different fertilizers smell the roses takes a long time, as a large amount of soil water reserves rose odorless. If the soil is heavy,then the plant will enjoy a very strong aroma.

Everyone who breeds roses, has many ways to their favorite plants, and if you use the above tips , you will enhance their knowledge and perhaps discover something new to growing roses. And remember: rose very fastidious and capricious plant, and if something goes wrong , you may lose your work and will be very upset.

Take care of roses , and they will delight you with its aroma.
2leep.com